Both Curves and Levels in Photoshop play vital roles in adjusting brightness, contrast, and color. While they sometimes overlap in functionality, each tool excels in specific areas. Aaron Nace of PHLEARN breaks down their unique features and provides practical tips to enhance your editing skills.
Start with Adjustment Layers
Aaron emphasizes the importance of using adjustment layers instead of applying changes directly to the image. Adjustment layers offer significant advantages:
- Non-destructive Editing: You can refine or undo adjustments at any time.
- Flexibility: Layer masks allow you to apply changes to specific parts of your image.
- Reusability: You can revisit and modify the settings without starting over.
To create an adjustment layer, navigate to Layer > New Adjustment Layer and select either Curves or Levels. Alternatively, use the adjustment layer icon in the Layers panel for quicker access.

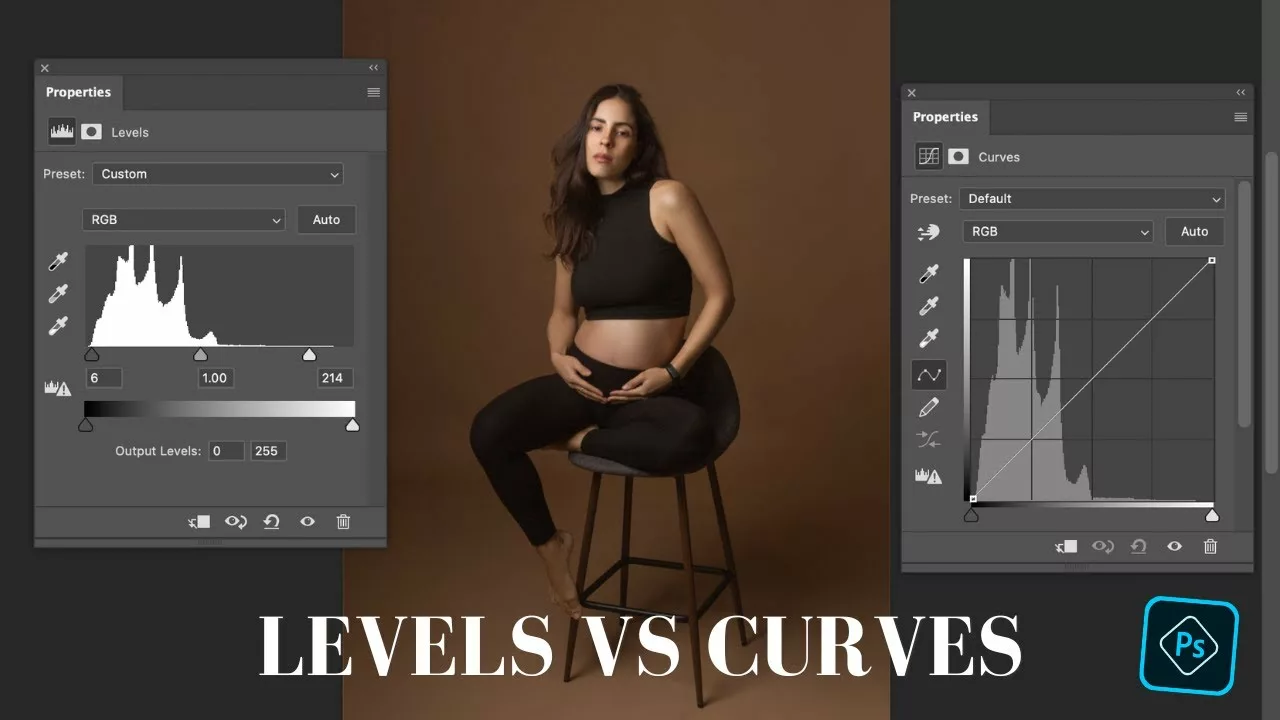
Levels: A Simple Yet Effective Tool
Levels work well for quick and straightforward tonal adjustments. The tool provides three main sliders:
- Black Point Slider: Controls the darkest parts of your image.
- White Point Slider: Adjusts the brightest areas.
- Midpoint Slider: Modifies midtones to make the image lighter or darker overall.
Aaron also highlights the Output Levels slider, which softens contrast by raising the black point or lowering the white point. While Levels are intuitive and great for beginners, they lack the ability to add multiple control points, limiting their flexibility for advanced edits.
Curves: Precision and Control
Curves provide unmatched control over your image’s tonal range. Like Levels, Curves adjust brightness and contrast but allow for greater precision. By adding multiple points, you can fine-tune shadows, highlights, and midtones simultaneously. The Hand Tool in Curves lets you directly target and adjust specific tones or colors within the image.
Curves also excel in color work. Aaron demonstrates how to:
- Adjust individual color channels (Red, Green, and Blue) for fine-tuned edits.
- Use the Hand Tool to enhance specific tones, such as adding warmth to skin without altering other colors.
These features make Curves indispensable for professional-level color grading and correcting subtle imbalances.
Presets and Auto Adjustments
Both tools include presets like “Strong Contrast” and “Lighter.” While these presets serve as useful starting points, especially for beginners, Aaron recommends refining them for professional results. Auto Adjustments in both tools provide quick fixes for exposure and contrast.
Choosing the Right Tool
No single tool fits every scenario. Aaron suggests:
- Use Levels for quick and basic exposure adjustments.
- Opt for Curves when you need detailed tonal and color edits.
To maximize the potential of either tool, combine them with layer masks to apply adjustments selectively. For more tips and advanced techniques, check out Aaron’s video tutorial.